How to Draw Bar Chart in Python TUTORIAL
A bar plot or bar nautical chart is a graph that represents the category of data with rectangular confined with lengths and heights that is proportional to the values which they correspond. The bar plots can be plotted horizontally or vertically. A bar chart describes the comparisons between the detached categories. One of the centrality of the plot represents the specific categories beingness compared, while the other axis represents the measured values corresponding to those categories.
Creating a bar plot
The matplotlib API in Python provides the bar() office which can be used in MATLAB fashion use or as an object-oriented API. The syntax of the bar() function to be used with the axes is as follows:-
plt.bar(ten, height, width, bottom, align)
The office creates a bar plot bounded with a rectangle depending on the given parameters. Following is a unproblematic example of the bar plot, which represents the number of students enrolled in different courses of an plant.
Python3
import numpy as np
import matplotlib.pyplot equally plt
information = { 'C' : twenty , 'C++' : 15 , 'Java' : thirty ,
'Python' : 35 }
courses = listing (data.keys())
values = list (data.values())
fig = plt.figure(figsize = ( x , 5 ))
plt.bar(courses, values, colour = 'maroon' ,
width = 0.4 )
plt.xlabel( "Courses offered" )
plt.ylabel( "No. of students enrolled" )
plt.title( "Students enrolled in different courses" )
plt.evidence()
Output-
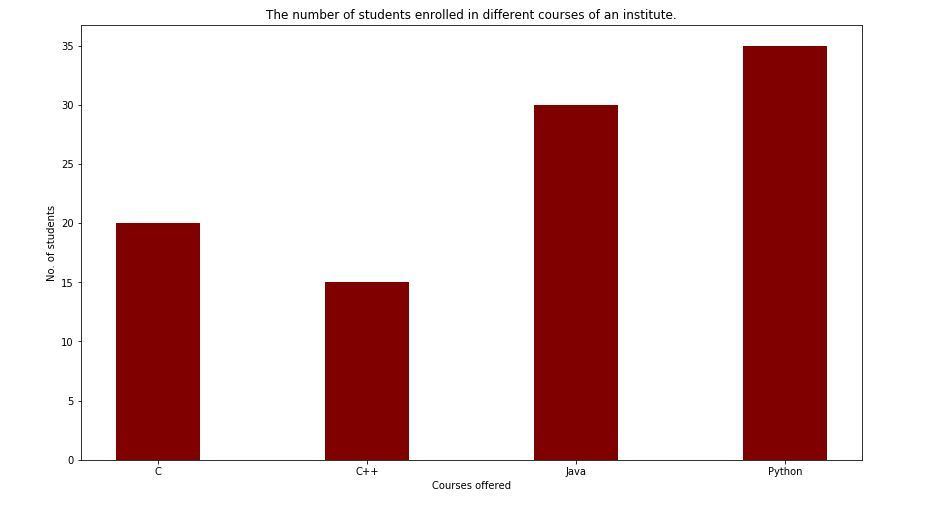
Here plt.bar(courses, values, color='maroon') is used to specify that the bar chart is to be plotted by using the courses column every bit the X-axis, and the values every bit the Y-centrality. The color attribute is used to set the color of the bars(maroon in this instance).plt.xlabel("Courses offered") and plt.ylabel("students enrolled") are used to characterization the corresponding axes.plt.title() is used to brand a title for the graph.plt.show() is used to evidence the graph equally output using the previous commands.
Customizing the bar plot
Python3
import pandas as pd
from matplotlib import pyplot equally plt
data = pd.read_csv(r "cars.csv" )
data.head()
df = pd.DataFrame(data)
name = df[ 'car' ].head( 12 )
price = df[ 'price' ].head( 12 )
fig = plt.figure(figsize = ( 10 , seven ))
plt.bar(name[ 0 : 10 ], toll[ 0 : 10 ])
plt.show()
Output:
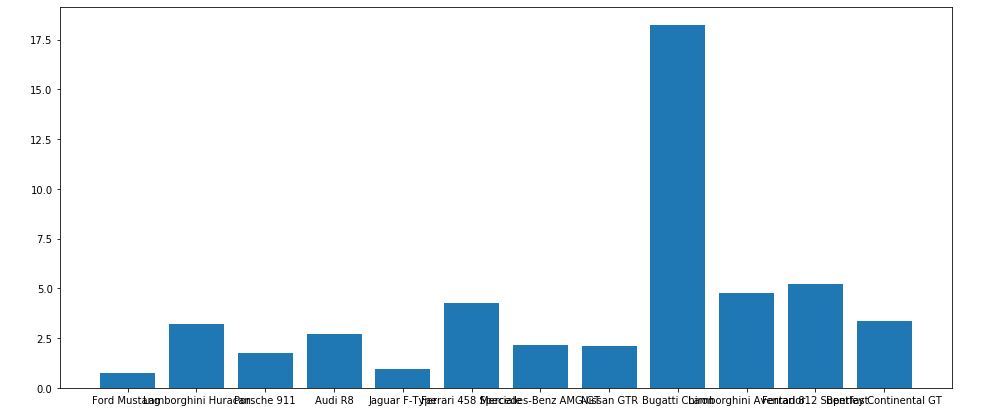
It is observed in the above bar graph that the X-centrality ticks are overlapping each other thus information technology cannot be seen properly. Thus by rotating the X-axis ticks, it can exist visible clearly. That is why customization in bar graphs is required.
Python3
import pandas every bit pd
from matplotlib import pyplot every bit plt
information = pd.read_csv(r "cars.csv" )
data.head()
df = pd.DataFrame(data)
name = df[ 'car' ].head( 12 )
toll = df[ 'price' ].caput( 12 )
fig, ax = plt.subplots(figsize = ( 16 , 9 ))
ax.barh(name, price)
for due south in [ 'top' , 'bottom' , 'left' , 'correct' ]:
ax.spines[s].set_visible( False )
ax.xaxis.set_ticks_position( 'none' )
ax.yaxis.set_ticks_position( 'none' )
ax.xaxis.set_tick_params(pad = 5 )
ax.yaxis.set_tick_params(pad = 10 )
ax.grid(b = True , color = 'greyness' ,
linestyle = '-.' , linewidth = 0.5 ,
alpha = 0.2 )
ax.invert_yaxis()
for i in ax.patches:
plt.text(i.get_width() + 0.2 , i.get_y() + 0.5 ,
str ( round ((i.get_width()), 2 )),
fontsize = x , fontweight = 'assuming' ,
color = 'grey' )
ax.set_title( 'Sports machine and their price in crore' ,
loc = 'left' , )
fig.text( 0.9 , 0.fifteen , 'Jeeteshgavande30' , fontsize = 12 ,
color = 'grey' , ha = 'right' , va = 'bottom' ,
alpha = 0.7 )
plt.show()
Output:

There are many more Customizations available for bar plots.
Multiple bar plots
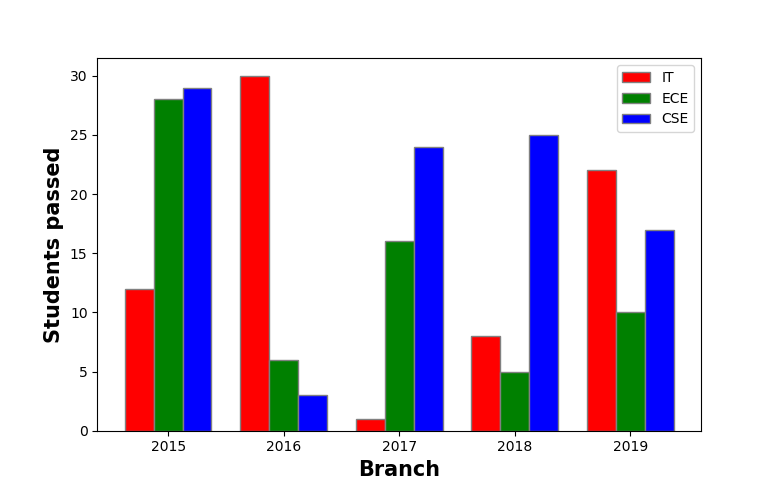
Multiple bar plots are used when comparing among the data set is to exist done when one variable is changing. We tin hands convert information technology as a stacked area bar nautical chart, where each subgroup is displayed past 1 on tiptop of the others. It can exist plotted by varying the thickness and position of the bars. Following bar plot shows the number of students passed in the technology branch:
Python3
import numpy as np
import matplotlib.pyplot as plt
barWidth = 0.25
fig = plt.subplots(figsize = ( 12 , eight ))
Information technology = [ 12 , 30 , 1 , viii , 22 ]
ECE = [ 28 , 6 , sixteen , v , 10 ]
CSE = [ 29 , 3 , 24 , 25 , 17 ]
br1 = np.arange( len (IT))
br2 = [x + barWidth for x in br1]
br3 = [x + barWidth for ten in br2]
plt.bar(br1, IT, colour = 'r' , width = barWidth,
edgecolor = 'grey' , characterization = 'It' )
plt.bar(br2, ECE, color = 'grand' , width = barWidth,
edgecolor = 'grayness' , characterization = 'ECE' )
plt.bar(br3, CSE, color = 'b' , width = barWidth,
edgecolor = 'grayness' , label = 'CSE' )
plt.xlabel( 'Branch' , fontweight = 'bold' , fontsize = 15 )
plt.ylabel( 'Students passed' , fontweight = 'bold' , fontsize = 15 )
plt.xticks([r + barWidth for r in range ( len (IT))],
[ '2015' , '2016' , '2017' , '2018' , '2019' ])
plt.fable()
plt.show()
Output:
Stacked bar plot
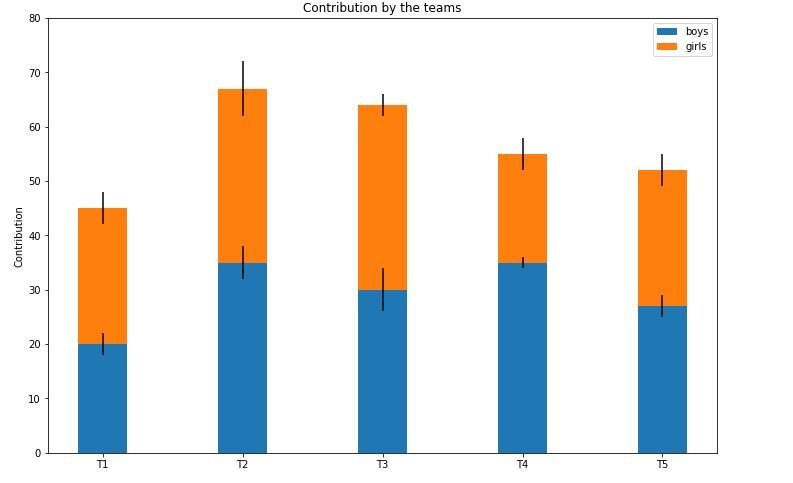
Stacked bar plots stand for different groups on top of one another. The summit of the bar depends on the resulting tiptop of the combination of the results of the groups. It goes from the bottom to the value instead of going from zippo to value. The post-obit bar plot represents the contribution of boys and girls in the team.
Python3
import numpy as np
import matplotlib.pyplot as plt
Northward = five
boys = ( 20 , 35 , 30 , 35 , 27 )
girls = ( 25 , 32 , 34 , twenty , 25 )
boyStd = ( 2 , 3 , 4 , 1 , 2 )
girlStd = ( 3 , 5 , ii , 3 , 3 )
ind = np.arange(N)
width = 0.35
fig = plt.subplots(figsize = ( 10 , 7 ))
p1 = plt.bar(ind, boys, width, yerr = boyStd)
p2 = plt.bar(ind, girls, width,
bottom = boys, yerr = girlStd)
plt.ylabel( 'Contribution' )
plt.championship( 'Contribution by the teams' )
plt.xticks(ind, ( 'T1' , 'T2' , 'T3' , 'T4' , 'T5' ))
plt.yticks(np.arange( 0 , 81 , 10 ))
plt.fable((p1[ 0 ], p2[ 0 ]), ( 'boys' , 'girls' ))
plt.show()
Output-
Attention geek! Strengthen your foundations with the Python Programming Foundation Course and acquire the nuts.
To begin with, your interview preparations Raise your Data Structures concepts with the Python DS Course. And to begin with your Machine Learning Journeying, join the Machine Learning - Basic Level Course
DOWNLOAD HERE
How to Draw Bar Chart in Python TUTORIAL
Posted by: johnhatted1965.blogspot.com

Comments
Post a Comment